After being set the task of doing 3D samples this week, I started looking for artists to inspire me for ideas of how to develop my work further.
The example below consists of a collection of different sized balls wrapped in tights.
This piece was inspired by the mutation of DNA to form tumours.
"Items such as defaced coins, C.D.'s containing corrupted data and irreparably scratched vinyls were encompassed within fabric."
This match piece called Chain Reactions was the kind of work I wanted to create with my candles, but I couldn't because I didn't have a safe environment to do it in.
I love how the end result shows different amounts of burning on the matches to almost create a pattern.
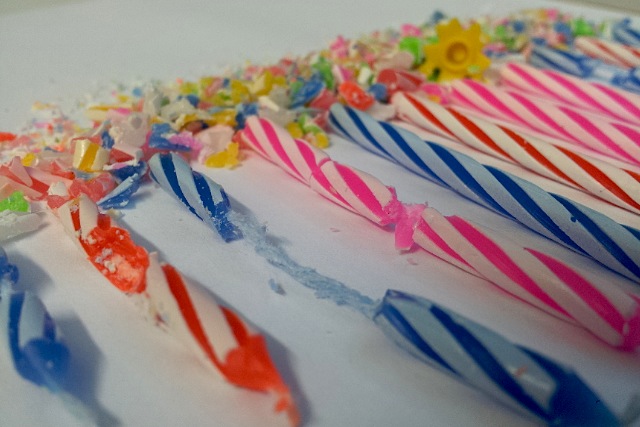
This week we were set the task of buying multiples from the poundshop.
I chose to buy a pack of 152 very small candles that came with candle holders.
The first task was to deconstruct our items and create something new.
We were also given a list of verbs to help us think of things to do to our objects. I liked this idea because it made me consider new possibilities which I may not have considered before, like the oblique strategy cards in my previous post ( www.jennasimpson94.blogspot.co.uk/2013/01/strategy-weekly-meeting-2.html )
I picked out 5 verbs randomly which were to twist, to suspend, to cut, to gather and to knot. This is the result of my playful experiment, including all of these verbs.
After this we were told that we needed to chose 4 more verbs and concentrate on making other objects from these verbs.
To shave:
To remove:
Removing parts of the wax from the wick
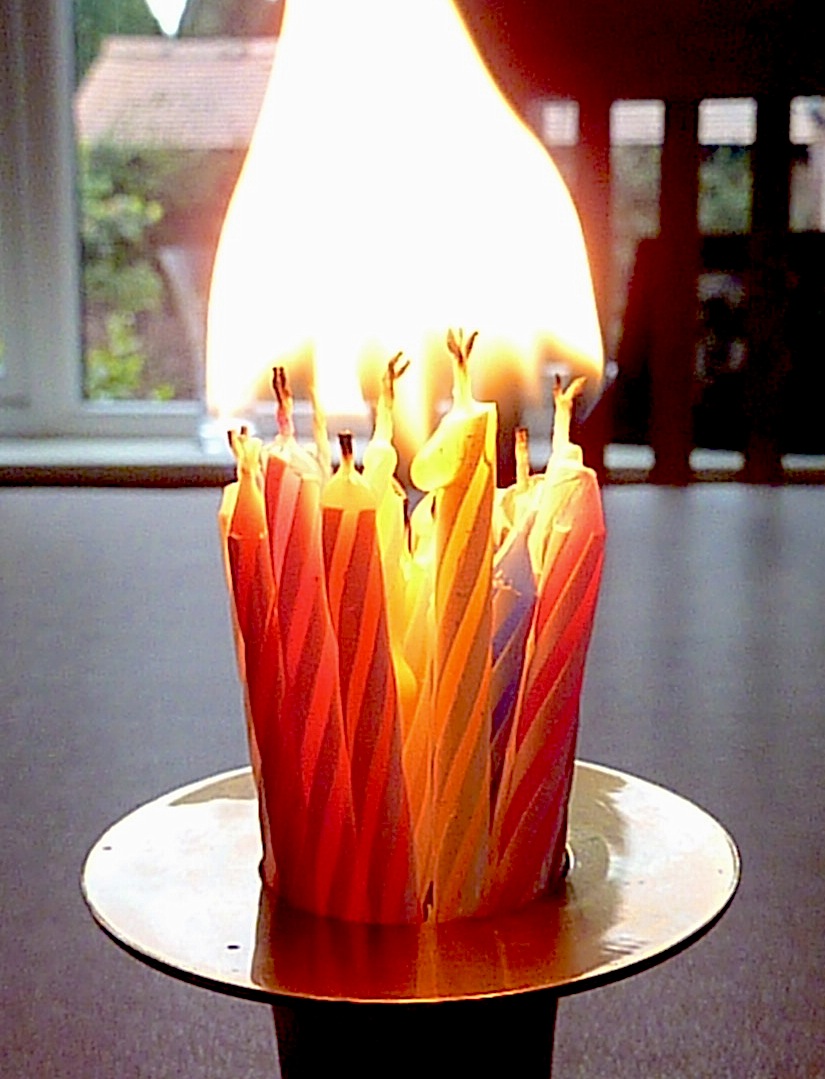
To fire:
I put as many candles as I could in a tea light holder and set them alight. Unfortunately the flame was far too big to carry on doing indoors, and due to the wind outside I had to leave my experiment like this. I wanted to melt the wax so much that It would start to stick together as a massive clump of candles, and it definitely started to do that.
The lecture today was based on our artistic strategy: how we approach projects, and work our way through them. It made me realise that I have a distinctive way of approaching projects which I hadn't realised before. What would happen if I mixed this up a bit??
One idea that interested me from the lecture was 'Obliqué strategy cards'. The cards present dilemmas which can challenge the mind to think of new ideas. This is great for me because my way of working is very logical, but these could make me create something that I wouldn't have thought of before, and make me think more laterally.
I therefore downloaded the app onto my phone. The first dilemma that was given to me was "Instead of building a wall, try making a brick", which I thought was a very interesting idea. I read this as "instead of concentrating on making a fabric sample, why not try making the fabric". Other people might look at it in other ways but I thought this would really challenge my thinking. Other cards that I thought I could be inspired my include, 'abandon normal instruments', 'Where is the edge? Where does the frame start?' and 'Retrace your steps'.
Overall, I think I'd like to leave my work to chance more often, whether it's choosing one of these cards or throwing a dice to make decisions.
Eleri Mills is a mixed media artist who used hand stitch, as well as paint, collage and pencil to create these large landscape pieces.
As a lot of my project is based on colour division, using a similar method to Eleri Mills might help me to represent my Chromatography results better.
She likes to stand up whilst working, which means that the work represents the energy that she physically puts into her art. I feel that my chromatography has a similar kind of moving energy and it would be interesting to see if I could also achieve the same result.
Throughout this week I have been learning a variety of different hand stitch techniques.
A selection of learnt stitches
After learning basic line stitch, one of my favourite tasks was a sample of line stitch on various different types of fabrics to see how they looked and felt to stitch on. My fabrics included natural cream wool, wool delaine, bubble wrap, monkswool, sheer synthetic fabric and embossed wallpaper. It was interesting to see how it felt to stitch on the fabrics, hand how they looked, for example seeing the stitch on the back of the bubble wrap and sheer fabrics. Although most of the time I like to work on sheer, silk fabrics, I realised that for embroidery I preferred the thicker, substantial fabrics such as the monkswool.
Herringbone and Faggoting
After getting to grips with the basic stitches I learnt Shisha and Couching. I loved these stitches because they involved other objects apart from just stitch. My first sample of Shisha used two pence coins, and later I used inked paper. I enjoyed couching because it can be applied to anything; you could couch pencils, fabric, thread or paper.
I'm looking forward to developing these techniques into samples for my data project.
Here is another very interesting artist called Jane Thomas who uses colours and patterns found naturally from the interference of reflected light rays from the surface of a thin film of water and soap held in a tiny frame (a bubble wand).
I love the patterns and textures in all of these pictures, and I'd love to try and replicate this myself.
The subject of todays lecture was the process of getting from A to B with a project. It helped me to realise some aspects of my practice that I could improve on. I know in myself that I am sometimes scared to step outside the box incase my ideas 'doesn't make sense' or 'doesn't fit in', but I realise that I need to be divergent in my thinking to make sure that I open my mind to anything that I could possibly think of to help my project flow. Even if I end up with an idea that doesn't seem to be working, this may 'piggyback' onto another idea, so I cant ignore ideas just because I assume they wont work. Another thing I get scared of in a project is getting lost in my work, coming to a dead end, not knowing where to go next, but I soon learned that it's okay to get lost. I feel as though I need to become more confident with my ideas to ensure that I have a strong project, without skipping any possibilities because I'm too afraid to try them.
The designer of the week this week also really caught my attention. Artcom has created this beautiful sculpture called Kinetic Rain which is the worlds largest kinetic sculpture at Changhi airport Terminal 1. The video really gives a feel for the piece of art and I love how it makes rain such a beautiful thing. After reading more into the artwork, I learnt that the sequence for movement starts with all the drops moving together, as one body, then they split off, creating a uniform sequence, but not all acting together, and then they fall apart from each other, like rain, and this is my favourite part.
I also feel that examples like this will improve my practice. Usually when I'm in the middle of a project, I don't reference interesting examples of art in my work if I don't think it's relevant, but I feel that doing more of this might influence my work in different ways. For example, this piece might make me consider scale, 3D art, sculpture and moving pieces as part of my project, which I might not have thought about before.
This week, after concentrating on oil and water, I decided to look at oil, ink and water. I started by seeing what effects ink and water had on their own. I took photos of various situations annotated below.
One drop of ink.
I let the drops of two different coloured inks disperse and added more drops, I like how the previous drops created line patterns penetrating from the surface.
When the drops hit the bottom of the container they created beautiful patterns.
When the container was left to settle, I added washing up liquid, and the ink on the surface gradually separated and fell towards the bottom creating another pattern.
After looking at the patterns created by ink and water, I decided to see what adding oil would do as well. If done carefully, it was possible to put drops of ink inside the oil droplets. I also think the ink background worked in the same way as the pictures did in my previous experiments, as the oil droplets took on the colour and the texture well.
After time, the droplets fell through and the falling ink could be seen from the top (through the oil droplets) and from the side as shown in the pictures below.
This week I have been doing drawings which represent my findings from the oil and water experiments that I have been doing. The examples below have been done using various different circular objects around the house as stamps, dipping them in black acrylic paint. I used toilet roll tubes, old cups, rolled up paper and for the really small circles, the end of an ink tube from a biro.
3 Ink drawings representing Oil and Water in different ways.
Large A1 Drawing representing the spreading of ink in water underneath oil droplets,
For these examples below, I cut out the circular pattern on black paper, keeping the cutout circles. I created a background using ink, and placed the cutout skeleton on one section, and rearranged the cutout circles in exactly the same shape to create an opposite version on another section.
Before I stuck down the skeleton I played around with light and shadows and saw some interesting effects.
Today I printed out some backgrounds which I thought would enhance the photos that I have been taking. The first was a black and white stripy background. The oil bubbles mostly seemed to take either the colour black or white, yet the washing up liquid bubbles showed the stripes as shown in the second picture which was created by swirling the washing up liquid
This picture shows how oil bubbles can show tone and texture.
I love the colour changes in this picture, from the red, bright white and the charcoal black.
In this photo, the photo in the background (flower) adds a nice texture, and this shows in some of the washing up liquid bubbles as well.
As part of my experimentation, I also added other substances such as honey and maple syrup but these just sunk to the bottom of my dish.